Red Velvet Strawberry Cheesecake: The Ultimate Three-Layer Indulgence
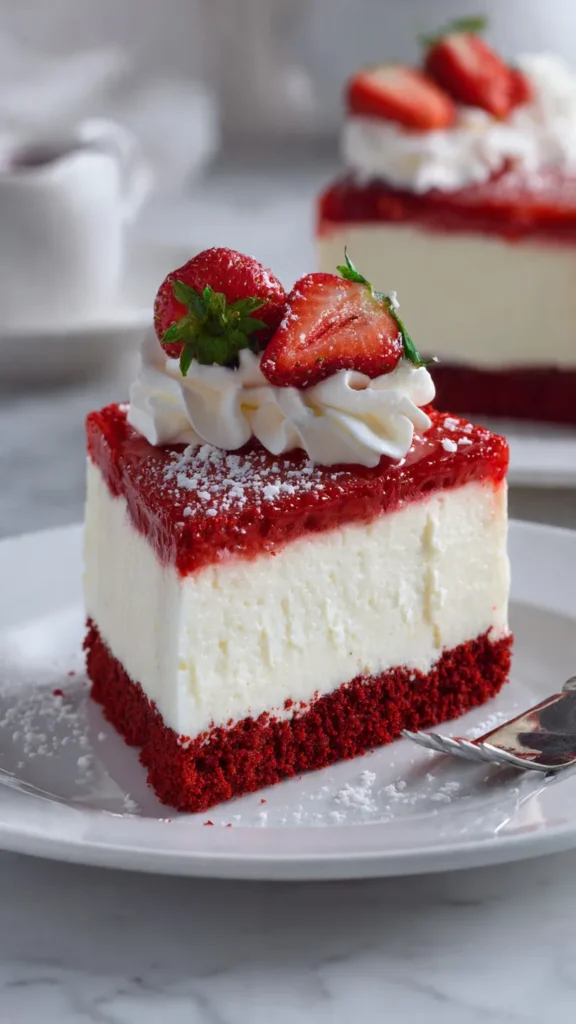
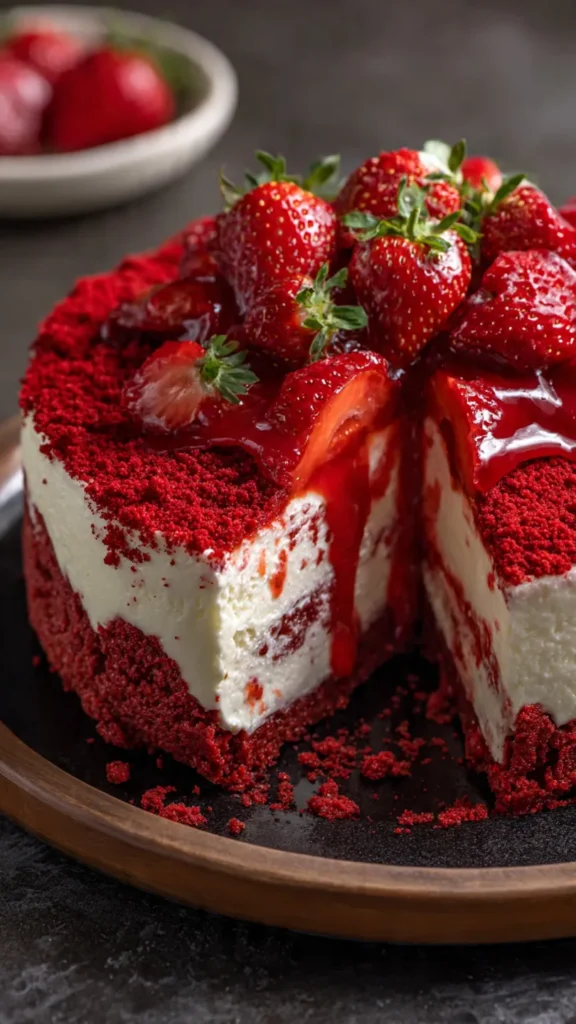
When dessert dreams come true, they look like this Red Velvet Strawberry Cheesecake. Picture three stunning layers working in perfect harmony: tender red velvet cake on top and bottom, a luscious cheesecake center, and a glossy strawberry topping that brings everything together. This isn’t just a dessert—it’s an experience that captures hearts with its dramatic red layers, creamy texture, and irresistible strawberry-kissed finish.
Perfect for Valentine’s Day, anniversaries, birthdays, or any celebration where you want to leave a lasting impression, this cheesecake delivers on every level. The rich cocoa notes in the red velvet complement the tangy cream cheese filling, while fresh strawberries add brightness and balance. Each forkful reveals contrasting textures and flavors that make this dessert unforgettable.
Table of Contents
Time Investment and Yield
Prep Time: 35 minutes
Baking Time: 1 hour 15 minutes
Cooling and Chilling: 4–5 hours minimum
Total Time: About 6 hours
Servings: 12 generous slices
Calories: Approximately 540 per slice
What You’ll Need
Red Velvet Cake Components
- 1½ cups all-purpose flour
- 1 tablespoon unsweetened cocoa powder
- ½ teaspoon baking soda
- ½ teaspoon salt
- ¾ cup buttermilk (room temperature)
- 1 teaspoon distilled white vinegar
- 1 teaspoon vanilla extract
- ½ teaspoon red gel food coloring (adjust for desired intensity)
- ½ cup unsalted butter (softened)
- ¾ cup granulated sugar
- 2 large eggs (room temperature)
Cheesecake Center
- 16 oz cream cheese (softened, about 450g)
- ¾ cup granulated sugar
- 1 teaspoon vanilla extract
- 2 large eggs (room temperature)
- ½ cup sour cream
- 2 tablespoons heavy cream
Strawberry Glaze
- 2 cups fresh strawberries (hulled and sliced)
- ¼ cup granulated sugar
- 1 tablespoon cornstarch
- 1 tablespoon fresh lemon juice
- ½ cup water
Optional Cream Cheese Frosting
- 4 oz cream cheese (softened, about 115g)
- 2 tablespoons unsalted butter (softened)
- 1 teaspoon vanilla extract
- 1 cup powdered sugar
- Fresh strawberries for garnish
How to Create This Masterpiece
Building the Red Velvet Foundation
Start by heating your oven to 350°F (175°C). Prepare two 8-inch round cake pans by greasing them thoroughly and lining the bottoms with parchment paper circles.
Whisk together your dry ingredients—flour, cocoa powder, baking soda, and salt—in a medium bowl. Set this mixture aside. In a liquid measuring cup, combine the buttermilk, vinegar, vanilla, and red food coloring, stirring until the color distributes evenly throughout.
Using an electric mixer, cream the softened butter with sugar in a large bowl. Beat for 2–3 minutes until the mixture becomes light, fluffy, and pale in color. This step incorporates air that helps create a tender crumb. Add the eggs one at a time, beating well after each addition to ensure proper emulsification.
Now comes the alternating method: add about a third of your dry ingredients to the butter mixture, mix briefly, then add half the buttermilk mixture. Continue alternating, ending with the dry ingredients. Mix only until you no longer see flour streaks—overmixing develops gluten and creates a tough cake.
Divide the vibrant red batter evenly between your prepared pans. Bake for 22–25 minutes. The cakes are done when a toothpick inserted in the center emerges clean or with just a few moist crumbs. Cool in the pans for 10 minutes, then turn out onto wire racks to cool completely before assembly.
Crafting the Creamy Cheesecake Heart
Lower your oven temperature to 325°F (160°C). Prepare an 8-inch springform pan with parchment paper on the bottom and a light coating of butter on the sides.
Beat the cream cheese and sugar together until absolutely smooth—this takes about 2 minutes with an electric mixer. Scrape down the bowl frequently to eliminate lumps. Add the vanilla and mix briefly. Incorporate the eggs one at a time, beating on low speed and scraping between additions. This gentle approach prevents incorporating too much air, which can cause cracks later.
Fold in the sour cream and heavy cream until the mixture is silky and uniform. Pour this luscious filling into your prepared springform pan, smoothing the top with a spatula.
Here’s the secret to a crack-free cheesecake: the water bath method. Place your springform pan inside a larger roasting pan or baking dish. Carefully pour hot water into the larger pan until it reaches halfway up the sides of the springform. This gentle, humid heat prevents the edges from overcooking while the center sets.
Bake for 55–65 minutes. The cheesecake is ready when the edges are set but the center still has a slight wobble when you gently shake the pan. Turn off the oven, crack the door open about 4 inches, and let the cheesecake rest inside for one hour. This gradual cooling prevents thermal shock that causes cracks.
Remove from the oven and water bath, then cool completely at room temperature. Cover with plastic wrap and refrigerate for at least 4 hours, though overnight is ideal. A fully chilled cheesecake is essential for clean slicing and easy assembly.
Preparing the Strawberry Crown
Combine sliced strawberries, sugar, cornstarch, lemon juice, and water in a small saucepan. Place over medium heat and stir frequently. As the mixture heats, the strawberries will release their juices and the cornstarch will activate, creating a glossy, thick glaze. This takes 5–7 minutes.
Remove from heat when the mixture coats the back of a spoon. Let it cool completely before using—warm topping will melt your frosting and make assembly messy.
Bringing It All Together
Once everything is completely cooled, you’re ready for the grand assembly. If your red velvet layers have domed tops, use a serrated knife to carefully level them for stable stacking.
Place your first red velvet layer on a serving plate or cake board. If using frosting, you can pipe a border around the edge to help contain the cheesecake layer. Carefully remove the chilled cheesecake from its springform pan and center it perfectly on the red velvet base. Top with your second red velvet layer.
Pour the cooled strawberry glaze over the top, using an offset spatula to spread it evenly. Let some glaze drip naturally down the sides for that professional bakery look. If using the optional cream cheese frosting, pipe decorative swirls around the base and top edge, then garnish with fresh strawberry slices.
Serving This Showstopper
This cheesecake tastes best when served cold directly from the refrigerator. Use a sharp knife dipped in hot water and wiped dry between each cut for clean slices. The temperature contrast between the chilled dessert and your palate creates an incredible eating experience.
Complement this rich dessert with hot espresso or cappuccino to cut through the sweetness. For special occasions, serve alongside champagne or sweet Moscato wine. A simple glass of cold milk works beautifully for casual gatherings.
Pro Secrets for Success
Temperature matters tremendously in baking. Room temperature eggs and dairy blend more smoothly, creating better texture in both the cake and cheesecake layers. Pull ingredients from the refrigerator about an hour before you start.
When mixing the red velvet batter, stop as soon as the flour disappears. Overmixing develops gluten strands that make the cake dense instead of tender. The cheesecake filling also benefits from gentle mixing—beat only until smooth to avoid incorporating excess air.
The water bath might seem fussy, but it’s worth the effort. If your springform pan isn’t perfectly sealed, wrap the outside with heavy-duty aluminum foil before placing it in the water bath. This prevents any seepage that could make the crust soggy.
Patience during chilling pays dividends. A properly chilled cheesecake has had time to fully set, making it far easier to handle during assembly. Rush this step and you risk a crumbly, broken layer that ruins your presentation.
Feel free to customize the fruit component. Raspberries create a more tart profile, while cherries offer a classic pairing with chocolate notes in the red velvet. Blueberries work wonderfully for patriotic occasions.
Nutritional Breakdown Per Slice
- Calories: 540
- Carbohydrates: 56g
- Protein: 8g
- Fat: 30g
- Saturated Fat: 17g
- Cholesterol: 120mg
- Sodium: 310mg
- Sugar: 42g
Planning Ahead and Storage Solutions
This dessert actually benefits from advance preparation. Bake the red velvet layers and cheesecake up to two days ahead, wrapping them tightly and refrigerating until assembly day. The strawberry topping can be made one day in advance as well.
Once assembled, the completed cheesecake keeps beautifully in the refrigerator for up to four days when covered loosely with plastic wrap or stored in an airtight container. The flavors actually deepen and meld over the first day or two.
For longer storage, slice the cheesecake and wrap individual portions tightly in plastic wrap, then aluminum foil. Freeze for up to two months. Thaw overnight in the refrigerator before serving. The texture remains remarkably good after freezing, making this an excellent make-ahead dessert for planned celebrations.
Why This Recipe Deserves a Place in Your Collection
This Red Velvet Strawberry Cheesecake represents the pinnacle of layered dessert craftsmanship. Each component contributes something essential: the red velvet layers provide structure and subtle chocolate depth, the cheesecake center delivers luxurious creaminess, and the strawberry topping adds brightness that keeps each bite interesting.
The visual impact cannot be overstated. When you slice through those dramatic red layers to reveal the pristine white cheesecake center topped with glistening strawberries, you create a moment that cameras can’t resist. This is Instagram-worthy food at its finest, but unlike many photogenic desserts, this one tastes as incredible as it looks.
Beyond special occasions, this recipe teaches valuable techniques that translate to countless other desserts. You’ll master the art of the water bath, learn proper cheesecake handling, and understand how to build stable layer cakes. These skills will serve you well in future baking adventures.
Whether you’re celebrating love on Valentine’s Day, marking a birthday milestone, or simply treating yourself to something extraordinary, this Red Velvet Strawberry Cheesecake delivers joy with every forkful. The combination of textures—from the soft red velvet crumb to the creamy cheesecake to the jammy strawberry topping—creates a dessert experience that lingers in memory long after the last bite disappears.
Make this once, and it will become your signature dessert, the one everyone requests for special occasions. That’s the power of a truly exceptional recipe that combines beauty, technique, and unforgettable flavor in one stunning creation.