Garlic Herb Butter Lobster Tails
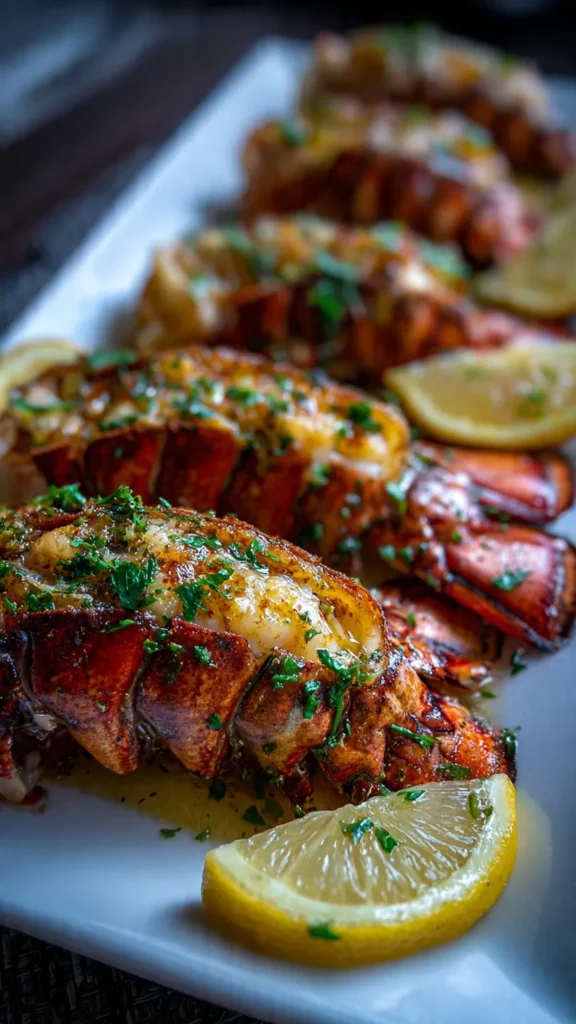
There’s something undeniably luxurious about lobster tails. Their sweet, delicate meat paired with rich garlic herb butter creates a restaurant-quality dish that feels like a special occasion—yet it’s surprisingly simple to make at home. Whether you’re planning a romantic dinner, celebrating a milestone, or just treating yourself to something extraordinary, these garlic herb butter lobster tails deliver elegance without the stress.
This recipe transforms frozen or fresh lobster tails into succulent, golden perfection in just 25 minutes. The secret lies in the butterflied presentation and a luscious herb-infused butter that seeps into every bite. No complicated techniques, no fancy equipment—just straightforward steps that guarantee impressive results every time.
Why You’ll Love This Recipe
Lobster tails intimidate many home cooks, but this recipe removes all the guesswork. The butterflying technique not only looks stunning but ensures the meat cooks evenly and absorbs maximum flavor from the garlic herb butter. Baking keeps things hands-off and foolproof, while an optional broil at the end adds that coveted caramelized finish.
The garlic herb butter is the star here—melted butter enriched with fresh garlic, aromatic herbs, a hint of paprika for color, and bright lemon juice to cut through the richness. It’s a flavor combination that complements lobster’s natural sweetness without overpowering it. Plus, this recipe scales beautifully whether you’re cooking for two or hosting a dinner party.
Ingredient Breakdown
Lobster Tails: Look for 5-6 ounce tails for individual servings. Frozen tails work perfectly—just thaw them overnight in the refrigerator or place them in a sealed bag under cold running water for 30 minutes. Fresh tails can be used if available, though frozen are often more budget-friendly and equally delicious.
Unsalted Butter: The foundation of your sauce. Unsalted allows you to control the seasoning precisely. As it melts, butter carries the garlic and herbs throughout the dish while adding luxurious richness.
Fresh Garlic: Minced finely so it distributes evenly and mellows during cooking. Fresh garlic provides that aromatic punch that defines this dish—don’t substitute with powder here.
Olive Oil: Combined with butter, olive oil adds depth and helps prevent the butter from burning at high heat. It also contributes a subtle fruity note that enhances the overall flavor profile.
Fresh Parsley: Adds brightness, color, and a hint of herbaceous freshness. Italian flat-leaf parsley works best for its robust flavor, though curly parsley is acceptable.
Paprika: Provides gentle warmth and a beautiful golden-orange hue that makes the lobster visually appealing. Sweet or smoked paprika both work—smoked adds an extra layer of complexity.
Italian Seasoning: A convenient blend of oregano, basil, thyme, and rosemary that adds herbal complexity without needing multiple bottles of dried herbs.
Salt and Black Pepper: Essential for highlighting the natural sweetness of lobster. Season thoughtfully since lobster meat is delicate.
Lemon Juice: The acid brightens everything, cutting through butter’s richness and enhancing lobster’s natural flavor. Fresh lemon juice is non-negotiable—bottled just doesn’t compare.
Lemon Wedges: For serving. That final squeeze of fresh lemon at the table elevates each bite.
Step-by-Step Instructions

Preparing Your Workspace
Before you begin, ensure your lobster tails are completely thawed if using frozen. Pat them dry with paper towels—excess moisture prevents proper browning. Preheat your oven to 425°F (220°C) so it’s ready when your lobster is prepped. Gather your kitchen shears or heavy-duty scissors, a small mixing bowl, and a baking dish that fits all tails comfortably without crowding.
Butterflying the Lobster Tails
This technique sounds fancy but takes just minutes to master. Using sharp kitchen shears, cut through the top shell starting from the wide end down to the tail fin. Cut only the shell—not the meat underneath. Stop before you reach the tail fin to keep the tail intact.
Gently use your fingers to loosen the meat from the shell, keeping it attached at the base near the tail. Carefully lift the meat up and rest it on top of the shell, creating that signature “butterflied” look. The meat should sit proudly on the shell with the shell acting as a natural serving vessel. This method allows the butter to pool around the meat and ensures even cooking.
Making the Garlic Herb Butter
In a small bowl, combine your melted butter with minced garlic, olive oil, chopped parsley, paprika, Italian seasoning, salt, black pepper, and fresh lemon juice. Whisk everything together until well blended. The mixture should be fragrant and golden with visible flecks of herbs and garlic. This herb butter can be made ahead and refrigerated—just rewarm gently before using.
Arranging and Seasoning
Place your butterflied lobster tails in a baking dish or rimmed sheet pan lined with foil for easy cleanup. Arrange them so they’re not touching, allowing heat to circulate evenly. Using a spoon, generously drizzle the garlic herb butter over each tail, making sure to coat the meat thoroughly. Don’t be shy—this butter is what makes the dish spectacular. Let some butter pool in the baking dish; it’ll serve as additional basting liquid and a finishing sauce.
Baking to Perfection
Slide your baking dish into the preheated oven on the center rack. Bake uncovered for 12-15 minutes. Cooking time depends on the size of your tails—smaller tails (4-5 oz) will be ready in 10-12 minutes, while larger ones (7-8 oz) may need the full 15 minutes or slightly longer.
You’ll know lobster is done when the meat turns opaque white with slight golden edges and the internal temperature reaches 140-145°F. The meat should be firm but tender, not rubbery. Overcooked lobster becomes tough and chewy, so watch carefully near the end of cooking time.
Optional Broiling
For that restaurant-style caramelized finish, switch your oven to broil and move the dish to the top rack. Broil for 1-2 minutes, watching constantly. The butter will bubble and the tops will develop gorgeous golden-brown spots. This step is optional but adds visual appeal and concentrated flavor.
Final Touch
Remove from the oven carefully—the dish and butter will be extremely hot. Spoon the butter from the pan over each tail one final time. This basting adds extra moisture and intensifies flavor. Transfer to serving plates, pour remaining pan butter around the lobster, and serve immediately with lemon wedges alongside.
Serving Suggestions
These garlic herb butter lobster tails pair beautifully with numerous sides. Consider creamy garlic mashed potatoes, buttery rice pilaf, or crusty bread for soaking up that incredible herb butter. Roasted asparagus, green beans, or Brussels sprouts add color and balance the richness. A crisp Caesar salad or simple arugula with lemon vinaigrette provides freshness.
For an upscale surf-and-turf dinner, serve alongside grilled steak. For pure seafood indulgence, add shrimp scampi or seared scallops. Don’t forget to provide small bowls of drawn butter for dipping and plenty of lemon wedges for squeezing.

Storage and Make-Ahead Tips
Lobster is best enjoyed immediately after cooking, but leftovers can be refrigerated in an airtight container for up to 2 days. Reheat gently in a 300°F oven wrapped in foil to prevent drying out. Alternatively, use leftover lobster meat in lobster rolls, pasta dishes, or salads.
The garlic herb butter can be prepared up to 3 days ahead and stored refrigerated. You can also butterfly the lobster tails several hours in advance—keep them covered and chilled until ready to butter and bake.
Pro Tips for Success
Thaw properly: Never force-thaw lobster in hot water or the microwave, which creates uneven texture. Plan ahead for refrigerator thawing or use the cold water method.
Don’t overcook: Lobster goes from perfectly tender to rubbery quickly. Start checking at 10 minutes for smaller tails.
Quality matters: Fresh or high-quality frozen tails yield the best results. Look for tails from cold waters like Maine or Canadian sources.
Butter temperature: Use warm melted butter, not hot. Too-hot butter can start cooking the garlic and change the flavor profile.
Rest briefly: Let lobster rest for 2-3 minutes after removing from the oven. This allows juices to redistribute for maximum tenderness.
Common Mistakes to Avoid
The most common error is overcooking. Check your lobster early and trust the visual cues—opaque white meat means it’s done. Another mistake is skimping on butter. This recipe calls for generous amounts because that’s what creates the luxurious sauce and keeps meat moist.
Cutting too deeply when butterflying can sever the meat from the shell, causing it to fall through. Cut just the shell for clean presentation. Finally, forgetting to season adequately results in bland lobster. Taste your butter mixture and adjust salt and lemon to your preference before applying.
Why This Method Works
Baking lobster tails at high heat creates a beautiful balance—the exterior develops color and the meat cooks quickly before it can toughen. The butterflied presentation maximizes butter contact and creates an impressive visual. Starting with room-temperature butter ensures it stays liquid and spreadable, coating every surface. The combination of butter and olive oil provides rich flavor while maintaining stability at oven temperatures.
Final Thoughts
Garlic herb butter lobster tails prove that elegant dining doesn’t require professional training or expensive equipment. With quality ingredients, proper technique, and confidence, you can create a special-occasion meal that rivals any steakhouse. The tender, sweet lobster meat paired with aromatic garlic herb butter delivers pure indulgence in every bite.
Whether you’re celebrating an anniversary, impressing dinner guests, or simply treating yourself, this recipe delivers consistent, crowd-pleasing results. Master this technique once and you’ll find yourself returning to it whenever you want to create something truly memorable. Don’t forget that final squeeze of fresh lemon—it brings everything together in the most perfect way possible.
Prep time: 10 minutes
Cook time: 15 minutes
Total time: 25 minutes
Yield: 4 servings