Chocolate Peanut Butter Earthquake Cake

If you’re a fan of the irresistible combination of chocolate and peanut butter, this Chocolate Peanut Butter Earthquake Cake is about to become your new favorite dessert. This show-stopping cake earned its name from the beautifully chaotic appearance created when ribbons of creamy peanut butter cheesecake swirl through rich chocolate cake, creating delicious “cracks” and “fissures” that look like an earthquake just hit your baking pan.
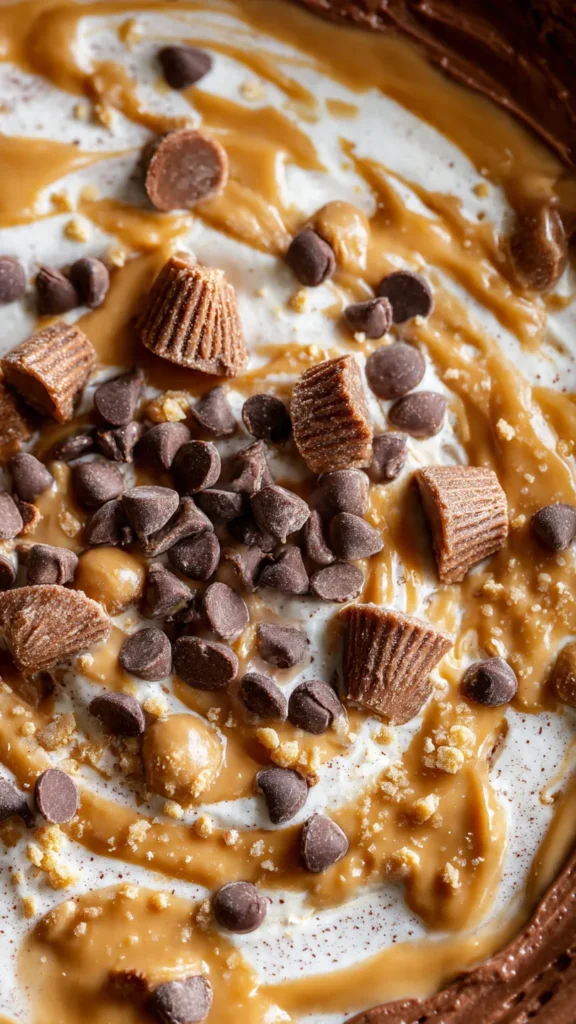
What makes this dessert truly special is the contrast of textures and flavors. You get the soft, moist chocolate cake base, punctuated by pockets of tangy cream cheese and nutty peanut butter, all studded with melty chocolate chips and mini Reese’s cups. Every bite delivers that perfect balance of sweet and slightly salty, creamy and cakey, making it impossible to have just one piece.
The best part? Despite its impressive appearance and restaurant-quality taste, this earthquake cake starts with a simple boxed cake mix. That means you can whip up this crowd-pleasing dessert without spending hours in the kitchen. It’s perfect for potlucks, birthday parties, holiday gatherings, or those moments when you simply need an extraordinary chocolate peanut butter fix.
Why You’ll Love This Recipe
This Chocolate Peanut Butter Earthquake Cake checks all the boxes for an outstanding dessert. The preparation is straightforward enough for beginner bakers, yet the results look and taste like something from a high-end bakery. The marbled effect happens naturally during baking, so there’s no intricate decorating required.
The peanut butter cheesecake swirl adds a luxurious richness that elevates this beyond your average chocolate cake. Unlike traditional frosted cakes, the sweet peanut butter mixture bakes right into the cake, creating pockets of creamy goodness throughout. The addition of mini Reese’s cups takes this dessert over the top, adding bursts of that classic peanut butter cup flavor in every slice.
This cake also travels well and actually tastes even better the next day once the flavors have melded together. It stays moist for days when properly stored, making it an excellent make-ahead option for busy schedules or planned events.
Ingredient Breakdown
Chocolate Cake Base: Starting with a boxed chocolate cake mix saves time without sacrificing flavor or texture. You’ll need whatever ingredients your specific cake mix calls for, typically eggs, oil, and water. The cake mix provides a reliable, consistent base that stays wonderfully moist.
Butter: Half a cup of butter forms the base of your peanut butter swirl mixture. Make sure to use real butter rather than margarine for the best flavor and texture. The butter helps create that smooth, pourable consistency needed for the swirl effect.
Cream Cheese: Eight ounces of softened cream cheese adds tanginess and creates that signature cheesecake-like quality in the swirl. Room temperature cream cheese blends smoothly without lumps, so take it out of the refrigerator about an hour before you start baking.
Creamy Peanut Butter: Half a cup of creamy peanut butter delivers that essential nutty flavor. Stick with standard creamy peanut butter rather than natural varieties, as natural peanut butter can separate and create texture issues in baking.
Vanilla Extract: Just half a teaspoon enhances all the other flavors and adds warmth to the peanut butter mixture.
Powdered Sugar: Three cups of powdered sugar sweetens the peanut butter swirl and helps achieve the right consistency. Powdered sugar dissolves easily and creates a smooth texture.
Chocolate Chips: Half a cup of chocolate chips scattered on top add extra chocolate intensity and create delightful melted pockets throughout the cake.
Mini Reese’s Cups: Three-quarters cup of mini Reese’s cups are the crowning glory. They soften during baking but maintain their shape, creating wonderful surprises in every bite.
Step-by-Step Instructions
Prepare the Chocolate Cake: Start by preparing your chocolate cake mix according to the package directions. This typically involves combining the cake mix with eggs, oil, and water in a large bowl, then mixing until smooth. Following the package instructions ensures your cake base turns out perfectly.
Set Up Your Pan: Grease a 9×13-inch baking pan thoroughly with butter or non-stick cooking spray. Pour the prepared chocolate cake batter into the pan and spread it evenly. Set this aside while you prepare the peanut butter swirl.
Make the Peanut Butter Mixture: Place half a cup of butter in a microwave-safe bowl and heat until completely melted. Add the softened cream cheese, peanut butter, and vanilla extract to the melted butter. Stir vigorously until the mixture is completely smooth and creamy with no lumps remaining.
Add the Sugar: Gradually add the powdered sugar to your peanut butter mixture, stirring until fully incorporated. The mixture should be thick but still pourable, similar to a thick frosting consistency.
Create the Swirl: Using a large spoon, drop generous dollops of the peanut butter mixture randomly across the surface of the chocolate cake batter. Don’t worry about making it perfect—the rustic, random placement is what creates that earthquake effect. You want some areas with more peanut butter swirl and others with less.
Add the Toppings: Sprinkle the chocolate chips evenly over the cake, followed by the mini Reese’s cups. Press them down very slightly so they make contact with the batter but don’t push them all the way in.
Bake to Perfection: Place your cake in a preheated 350-degree oven and bake for 45-50 minutes. The cake is done when a toothpick inserted into the chocolate cake portions comes out with just a few moist crumbs. The peanut butter swirl areas will still look slightly soft, which is exactly what you want.
Cool and Serve: Remove the cake from the oven and let it cool in the pan for at least 15-20 minutes before slicing. The cake will firm up as it cools, making it easier to cut clean pieces.
Tips for Success
For the smoothest peanut butter swirl, ensure your cream cheese is truly softened to room temperature. Cold cream cheese will create lumps that are difficult to smooth out. If you’re short on time, cut the cream cheese into small cubes to help it soften faster.
Don’t overmix your chocolate cake batter. Mix just until the ingredients are combined to keep the cake tender and light. Overmixing can lead to a tougher texture.
When dropping the peanut butter mixture onto the cake batter, use a variety of dollop sizes for visual interest. Some larger spoonfuls and some smaller ones create more dramatic swirls and valleys.
If your peanut butter mixture seems too thick to drop easily, you can thin it slightly with a tablespoon or two of milk. It should fall from your spoon in thick ribbons.
Storage and Serving
This Chocolate Peanut Butter Earthquake Cake can be stored covered at room temperature for up to two days or refrigerated for up to five days. The texture stays wonderfully moist, and many people prefer it chilled. If you refrigerate it, let slices sit at room temperature for about 10 minutes before serving to bring out the full flavor.
For serving, this cake is delicious on its own, but you can take it to the next level with a scoop of vanilla ice cream or a dollop of whipped cream. A drizzle of chocolate or caramel sauce also makes an excellent addition for extra indulgence.
This recipe yields about 15 generous servings, making it perfect for feeding a crowd. Each piece contains approximately 385 calories, with a satisfying balance of cake, creamy filling, and chocolate candy pieces.
Variations to Try
While this recipe is perfect as written, you can customize it to suit your preferences. Try using a different cake mix flavor like devil’s food or German chocolate for subtle variations. You could swap the mini Reese’s cups for chopped regular Reese’s, peanut butter chips, or even butterscotch chips for a different flavor profile.
For an even more decadent version, add a layer of hot fudge or caramel sauce drizzled over the cake before adding the peanut butter mixture. You can also experiment with crunchy peanut butter if you enjoy extra texture in your desserts.