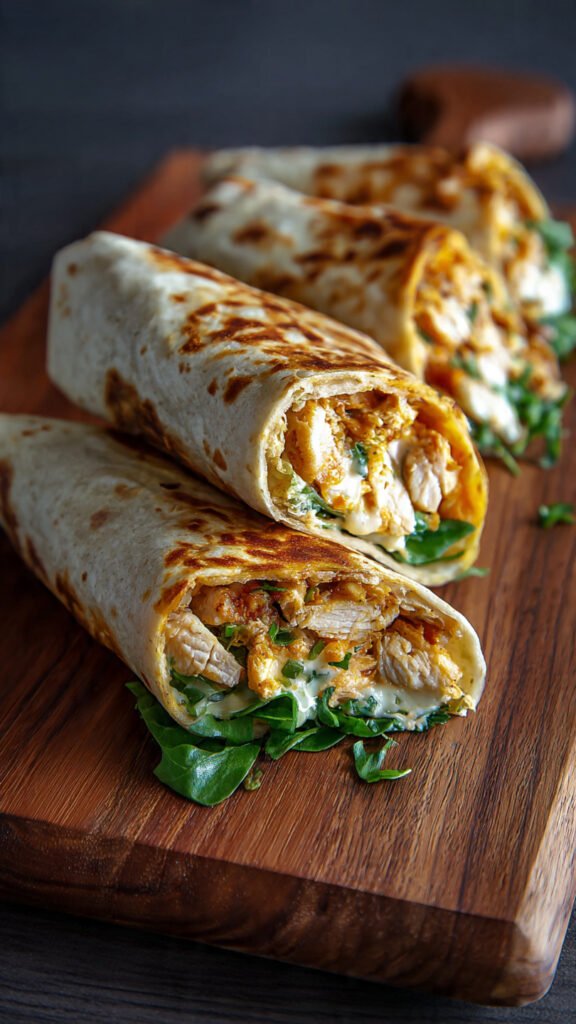
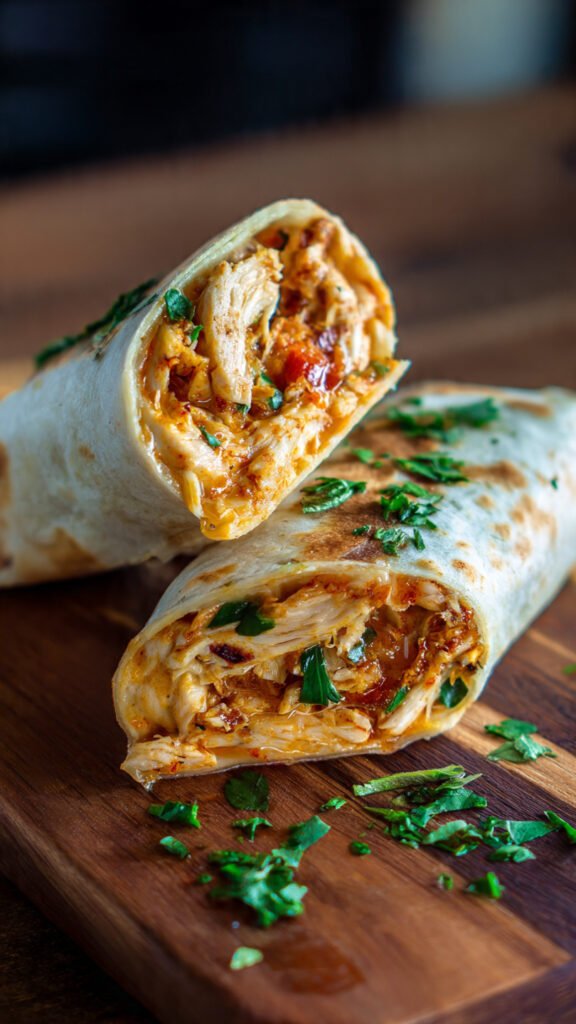
Cheesy Garlic Chicken Wraps
Crispy, Melty Perfection Wrapped Up Just for You
There’s something magical about biting into a warm tortilla filled with juicy garlic-infused chicken and strings of melted cheese that just won’t quit. These cheesy garlic chicken wraps bring restaurant-quality flavor straight to your kitchen, all while keeping things refreshingly simple. Whether you’re racing against the clock on a busy Tuesday evening, packing lunches for the week ahead, or looking for a crowd-favorite to share with friends, this recipe delivers exactly what you’re craving.
What makes these wraps truly special is the combination of textures and flavors working together in perfect harmony. Picture tender chicken seasoned with aromatic garlic, blanketed in two types of cheese for maximum meltiness, all wrapped in a golden-toasted tortilla that crisps beautifully in the pan. The creamy garlic sauce ties everything together, adding richness and an extra punch of garlicky goodness.
This comprehensive guide covers everything from selecting the right ingredients to mastering folding techniques, plus smart tips for customization and meal prep success. Let’s dive into creating these irresistible wraps that will have everyone asking for seconds.
What You’ll Need (Makes 4 Generous Wraps)
Gather these ingredients before you begin. All measurements follow standard U.S. conventions:
For the Chicken:
- 2 large boneless chicken breasts, cut into cubes (approximately 1 to 1¼ pounds total)
- 1 tablespoon olive oil
- 2 teaspoons garlic powder (or substitute with 3 cloves fresh minced garlic for bolder flavor)
- 1 teaspoon onion powder
- 1 teaspoon paprika (adds warmth and subtle smokiness)
- Salt and freshly ground black pepper to taste
For Assembly:
- 1 cup shredded sharp cheddar cheese (mild works too if you prefer)
- ½ cup shredded mozzarella cheese (the secret to that perfect cheese pull)
- 4 large burrito-size flour tortillas (10–12 inches in diameter)
- ½ cup creamy garlic sauce (homemade or quality store-bought)
- Fresh parsley, finely chopped (optional garnish)
Make Your Own Garlic Sauce
Skip the store if you have five minutes to spare. This homemade version is fresher, tastier, and easily adjustable to your preferences.
Ingredients:
- ½ cup mayonnaise
- 2 tablespoons sour cream
- 2 teaspoons fresh lemon juice
- 2 garlic cloves, minced to a fine paste
- ½ teaspoon kosher salt
- ¼ teaspoon black pepper
Method:
Combine all ingredients in a small bowl and whisk until completely smooth. Taste and adjust seasoning as needed—add more lemon for brightness or extra garlic for intensity. Refrigerate for at least 15 minutes before using to allow the flavors to meld together beautifully.
Step-by-Step Preparation

Prepare and Season Your Chicken
Begin with high-quality boneless, skinless chicken breasts. Cut them into uniform ¾-inch pieces to ensure even cooking throughout. Consistency in size matters here—larger chunks may stay raw in the center while smaller bits overcook and dry out.
Transfer the cubed chicken to a large mixing bowl. Drizzle with olive oil, then add the garlic powder, onion powder, paprika, salt, and pepper. Toss everything together thoroughly, making sure every piece gets coated with the seasoning blend. The oil does double duty here: it helps the seasonings stick while keeping the chicken moist during cooking.
Cook the Chicken to Perfection
Place a large skillet over medium heat and let it warm for about a minute. Add your seasoned chicken in a single layer—if your pan isn’t large enough, cook in two batches rather than crowding the pieces together.
Sauté for 6–8 minutes, stirring every couple of minutes to promote even browning on multiple sides. You’re looking for a beautiful golden-brown exterior and completely cooked interior with no trace of pink. Use a meat thermometer if you want to be certain—it should read 165°F (74°C) at the thickest part.
Once cooked through, transfer the chicken to a plate and set aside while you prepare the wraps.
Pro insight: For deeper flavor and better texture, avoid moving the chicken too frequently at first. Let it develop a nice sear on one side before stirring.
Build Your Wraps
Lay your tortillas on a clean workspace. If they’ve been refrigerated, warm them briefly in the microwave for 10 seconds or in a dry skillet to make them more pliable and less likely to tear.
Spread approximately 2 tablespoons of creamy garlic sauce across the center of each tortilla, leaving about 2 inches clear on each side for folding. Distribute the cooked chicken equally among the four tortillas, piling it in the center.
Sprinkle ¼ cup of cheddar cheese and 2 tablespoons of mozzarella over each portion of chicken. Feel free to toss in extras at this stage—a handful of baby spinach, sliced bell peppers, or chopped tomatoes all work wonderfully.
To fold properly: bring the left and right sides inward first, then roll from the bottom up tightly, tucking as you go to create a secure package. The seam should end up on the bottom.
Create That Golden Crust
Return your skillet to medium heat and add a light coating of oil or cooking spray. Place each wrap seam-side down in the pan, which helps seal it closed as it cooks.
Press gently with a spatula and cook for 2–3 minutes until golden brown and crispy. Carefully flip and repeat on the other side. You’ll know they’re ready when the cheese has melted completely and the tortilla has developed a beautiful golden-brown color with slight char marks.
Remove from heat and let rest for about a minute before slicing—this brief waiting period allows the filling to set slightly, making them easier to cut and eat.
Finishing Touches
Slice each wrap diagonally down the middle for an attractive presentation. Serve immediately while they’re still hot and the cheese is at peak gooeyness.
Garnish with a sprinkle of fresh parsley and an extra drizzle of garlic sauce if desired. These wraps shine alongside crispy fries, a fresh garden salad, tangy coleslaw, or pickle spears for contrast.
Time Investment
- Prep Time: 10 minutes
- Cook Time: 15 minutes
- Total Time: 25 minutes
Nutritional Information (Per Wrap)
- Calories: approximately 450 kcal
- Protein: 32g
- Fat: 23g
- Carbohydrates: 28g
- Fiber: 2g
- Sugar: 2g
These values are estimates and may vary based on specific brands and any modifications you make.
Expert Tips for Outstanding Results
Temperature Matters
Room temperature tortillas fold without cracking. Pull them from the refrigerator 20 minutes before assembly or warm them briefly.
Mix Up the Filling
This recipe welcomes creativity. Consider adding sautéed mushrooms, roasted red peppers, crispy bacon, caramelized onions, or fresh jalapeños for heat.
Choose Your Cheese Wisely
Mozzarella provides stretch and mild creaminess, while cheddar brings sharpness. Experiment with Monterey Jack, pepper jack, gouda, or provolone for different flavor profiles.
Upgrade Your Equipment
A panini press or grill pan creates restaurant-quality grill marks and ensures even crisping on both sides simultaneously.
Meal Prep Like a Pro
Assemble wraps without toasting, wrap individually in foil, and freeze for up to two months. Thaw overnight in the refrigerator, then cook fresh when ready to eat.
Creative Variations
Spicy Version: Mix hot sauce, sriracha, or chipotle powder into your garlic sauce for a fiery kick.
Low-Carb Alternative: Use large romaine or butter lettuce leaves instead of tortillas for a lighter, keto-friendly option.
Time-Saving Shortcut: Rotisserie chicken from the store works perfectly—just dice it, warm it up with the seasonings, and proceed with assembly.
Buffalo Style: Toss cooked chicken in buffalo sauce and add ranch dressing instead of garlic sauce, plus blue cheese crumbles.
Why This Recipe Works
These wraps hit every mark: they’re fast enough for hectic weeknights, impressive enough for company, and versatile enough to please different taste preferences. The 25-minute timeline means you can have dinner on the table faster than ordering takeout, and the make-ahead friendly nature makes them ideal for meal prepping Sunday through Wednesday lunches.
Kids love the familiar, comfort-food flavors, while adults appreciate the satisfying combination of crispy and creamy textures. Plus, you control every ingredient, making them healthier than most restaurant versions.
Serving Suggestions
For Lunch Boxes: Wrap tightly in foil and slice in half. They hold up well for several hours.
For Parties: Cut each wrap into three pieces and arrange on a platter with dipping sauces for easy finger food.
For Dinner: Pair with tomato soup, a simple Caesar salad, or roasted vegetables for a complete, balanced meal.
Storage and Reheating
Refrigeration: Store wrapped in foil or in airtight containers for up to 3 days. The tortilla will soften slightly but still tastes delicious.
Reheating: For best results, reheat in a skillet over medium heat or in a 350°F oven until warmed through and crispy again. Avoid the microwave if possible, as it makes the tortilla soggy.
Freezing: Freeze assembled but uncooked wraps for maximum freshness. Wrap each individually in parchment paper, then foil. Thaw completely before cooking.
Final Thoughts
Cheesy Garlic Chicken Wraps deserve a permanent spot in your recipe repertoire. They deliver big on flavor while keeping preparation refreshingly straightforward. The beauty lies in their adaptability—tweak the seasonings, swap the add-ins, adjust the heat level—and you’ve got a new favorite every time.
Whether you’re feeding hungry teenagers, hosting a casual get-together, or simply treating yourself to something delicious after a long day, these wraps deliver satisfaction in every bite. Make them once, and they’ll quickly become your go-to answer for “what’s for dinner?”
Fair warning: you’ll want to make a double batch. These disappear fast, and having extras is never a bad thing.