Shrimp Sandwich with Spicy Creamy Coleslaw (Crispy & Irresistible!)
There’s something irresistibly satisfying about biting into a shrimp sandwich where crispy, golden-fried shrimp meets cool, crunchy coleslaw with just the right amount of spicy kick. I’ll never forget my first shrimp po’ boy at a tiny seafood shack on the Louisiana coast—the contrast of hot, crunchy shrimp against cold, tangy slaw, all nestled in a butter-toasted bun that somehow held together despite being loaded to capacity. That perfect bite changed my understanding of what a sandwich could be.
Shrimp sandwiches have been coastal cuisine staples for generations, from New Orleans po’ boys to New England shrimp rolls to Southern fried shrimp sandwiches. The key to an exceptional shrimp sandwich lies in the perfect balance: crispy exterior on tender shrimp, creamy yet tangy coleslaw that adds crunch without making the bread soggy, and a soft bun that can handle all these elements without falling apart. When spicy coleslaw enters the equation, the heat level elevates the entire experience from delicious to absolutely addictive.
This recipe delivers restaurant-quality shrimp sandwiches at home in just 30 minutes. You’ll learn how to achieve perfectly crispy fried shrimp with a light, crunchy coating, create a spicy coleslaw that balances heat and tang, and assemble everything into a sandwich that’s greater than the sum of its parts. Whether you’re craving coastal flavors, planning a summer gathering, or simply want to elevate your lunch game, these shrimp sandwiches will become your new obsession.
Table of Contents
Prep Time: 15 min | Cook Time: 15 min | Total: 30 min
Yield: 4 sandwiches | Difficulty: Easy to Medium
Quick Stats Box:
- Cuisine: American Coastal/Southern
- Course: Main dish/Lunch
- Diet: Can be adapted for gluten-free (with GF breading and buns)
- Best for: Quick dinners, summer meals, casual entertaining, seafood lovers, weekend lunches
Why This Recipe Works
- Double-breading creates ultimate crunch — Flour, egg, and seasoned breadcrumb coating creates a shatteringly crispy exterior that stays crunchy even with sauce
- Spicy coleslaw adds heat and texture — The creamy, tangy slaw with jalapeño kick provides cooling contrast while adding essential crunch
- Quick cooking prevents rubbery shrimp — Large shrimp cook in just 2-3 minutes, ensuring tender texture without overcooking
- Balanced flavors hit all notes — Sweet shrimp, spicy slaw, tangy sauce, and buttery bread create perfect harmony in every bite
- Make-ahead friendly coleslaw — The slaw actually improves after sitting, making this perfect for meal prep or entertaining
Ingredient Spotlight
Large Shrimp—The Star
Use large (16-20 count) or jumbo (21-25 count) shrimp for best sandwich results. Smaller shrimp fall through the coating and create uneven texture. Fresh or high-quality frozen shrimp both work—just ensure they’re completely thawed and patted dry before breading.
Buttermilk—The Secret Tenderizer
Soaking shrimp briefly in buttermilk tenderizes them while adding subtle tang and helping the coating adhere perfectly. The acidity breaks down proteins slightly for extra-tender results.
Panko Breadcrumbs—Maximum Crunch
Japanese-style panko breadcrumbs create lighter, crispier coating than regular breadcrumbs. Their larger, flakier texture creates more surface area for crunch and absorbs less oil during frying.
Ingredients
For the Fried Shrimp:
- 1½ pounds large shrimp (16-20 count), peeled and deveined, tails removed
- 1 cup buttermilk
- 1 cup all-purpose flour
- 1½ cups panko breadcrumbs
- ½ cup regular breadcrumbs (or more panko)
- 2 teaspoons Old Bay seasoning (or Cajun seasoning)
- 1 teaspoon garlic powder
- 1 teaspoon smoked paprika
- 1 teaspoon kosher salt
- ½ teaspoon black pepper
- ¼ teaspoon cayenne pepper (optional, for extra heat)
- 2 large eggs, beaten
- Vegetable oil for frying (about 2-3 cups)
For the Spicy Creamy Coleslaw:
- 3 cups green cabbage, thinly shredded
- 1 cup purple cabbage, thinly shredded (optional, for color)
- 1 large carrot, julienned or shredded
- 2 green onions, thinly sliced
- 1 jalapeño, seeds removed, finely diced
- ½ cup mayonnaise
- 2 tablespoons sour cream (or Greek yogurt)
- 1 tablespoon apple cider vinegar
- 1 tablespoon fresh lime juice
- 1 teaspoon honey (or sugar)
- 1 teaspoon hot sauce (Sriracha, Tabasco, or your favorite)
- ½ teaspoon celery salt
- ½ teaspoon garlic powder
- Salt and black pepper to taste
For Assembly:
- 4 brioche buns or soft hoagie rolls
- 3 tablespoons unsalted butter, softened
- Lettuce leaves (butter lettuce or romaine)
- Tomato slices (optional)
- Additional hot sauce (for serving)
- Lemon wedges (for serving)
Optional Sauce:
- ½ cup mayonnaise
- 1 tablespoon ketchup
- 1 tablespoon hot sauce
- 1 teaspoon Worcestershire sauce
- ½ teaspoon garlic powder
- Squeeze of lemon juice
Ingredient Notes:
- Quality matters most: Use fresh or high-quality frozen shrimp—avoid pre-cooked shrimp which become rubbery when fried
- Room temperature is key: Bring shrimp to room temperature before breading for even cooking
- Don’t skip: The buttermilk soak tenderizes shrimp and helps coating adhere—don’t substitute with regular milk
Essential Equipment
You’ll Need:
- Large mixing bowls (3 for breading station)
- Deep heavy-bottomed pot or Dutch oven for frying
- Cooking thermometer (for oil temperature)
- Wire rack set over baking sheet (for draining)
- Tongs or slotted spoon
- Paper towels
- Large bowl for coleslaw
- Whisk
Nice to Have:
- Deep fryer (for consistent temperature control)
- Mandoline slicer (for thin, even cabbage shreds)
- Splatter screen (to contain oil splatter)
How to Make Shrimp Sandwich with Spicy Creamy Coleslaw (Step-by-Step)
Step 1: Make the Spicy Coleslaw
In a large bowl, combine shredded green cabbage, purple cabbage, carrot, green onions, and diced jalapeño. In a separate small bowl, whisk together mayonnaise, sour cream, apple cider vinegar, lime juice, honey, hot sauce, celery salt, garlic powder, salt, and pepper until smooth and creamy.
Pour the dressing over the cabbage mixture and toss thoroughly until all vegetables are evenly coated. Taste and adjust seasoning—add more hot sauce for heat, more lime juice for tang, or more honey for sweetness. Cover and refrigerate for at least 15 minutes (or up to 24 hours) to allow flavors to meld and cabbage to soften slightly.
Pro tip: The coleslaw actually improves after sitting for 30 minutes to 2 hours as the cabbage releases moisture and absorbs the dressing flavors.
Step 2: Prepare the Shrimp
Pat shrimp completely dry with paper towels—any moisture prevents coating from adhering properly. Place shrimp in a bowl and pour buttermilk over them, ensuring all shrimp are submerged. Let soak for 10-15 minutes while you prepare the breading station. This tenderizes the shrimp and helps create a better crust.
Temperature matters: Room temperature shrimp cook more evenly than cold shrimp straight from the refrigerator. Let them sit out for 15-20 minutes before breading.
Step 3: Set Up Breading Station
Prepare three shallow bowls or plates for a classic breading assembly line:
- Bowl 1: All-purpose flour seasoned with 1 teaspoon salt and ½ teaspoon black pepper
- Bowl 2: Beaten eggs (2 large eggs, whisked until smooth)
- Bowl 3: Mix panko breadcrumbs, regular breadcrumbs, Old Bay seasoning, garlic powder, smoked paprika, remaining salt, pepper, and cayenne until well combined
Arrange the bowls in order: flour, egg, breadcrumb mixture.
Step 4: Bread the Shrimp
Remove shrimp from buttermilk one at a time, letting excess drip off. Working with one shrimp at a time:
- Dredge in seasoned flour, coating completely and shaking off excess
- Dip in beaten egg, letting excess drip off
- Press firmly into breadcrumb mixture, coating all sides and pressing gently so crumbs adhere
Place breaded shrimp on a wire rack or plate. Repeat with all shrimp. Let breaded shrimp rest for 5-10 minutes—this helps the coating set and prevents it from falling off during frying.
Common mistake: Breading all shrimp at once with wet hands contaminates the breadcrumbs. Use one hand for wet ingredients (egg) and one hand for dry ingredients (flour and breadcrumbs) to keep the station clean.
Step 5: Heat the Oil
Pour vegetable oil into a deep, heavy pot or Dutch oven to a depth of 2-3 inches. Heat oil to 350-375°F over medium-high heat, using a thermometer to monitor temperature. Proper oil temperature is crucial—too cool and shrimp absorb oil and become greasy; too hot and coating burns before shrimp cook through.
Test kitchen discovery: Drop a few breadcrumbs into the oil—if they sizzle immediately and float, the oil is ready. If they sink, the oil is too cool. If they brown instantly, the oil is too hot.
Step 6: Fry the Shrimp
Working in batches of 4-5 shrimp (don’t overcrowd the pot or oil temperature drops), carefully lower breaded shrimp into hot oil using tongs or a slotted spoon. Fry for 2-3 minutes, flipping halfway through, until golden brown and crispy on both sides. The shrimp will float when done and the coating should be deep golden brown.
Transfer fried shrimp to a wire rack set over a baking sheet to drain excess oil. Do NOT drain on paper towels—this traps steam underneath and makes the coating soggy. Season immediately with a light sprinkle of salt while still hot.
Repeat with remaining shrimp, allowing oil to return to proper temperature between batches (about 1-2 minutes).
Don’t rush: Maintaining consistent oil temperature between batches ensures every shrimp is perfectly crispy. Use the thermometer and adjust heat as needed.
Step 7: Toast the Buns
While the last batch of shrimp fries, prepare the buns. Slice brioche buns or hoagie rolls in half and spread softened butter on the cut sides. Heat a large skillet or griddle over medium heat and toast buns butter-side down until golden brown and crispy, about 2-3 minutes. Watch carefully—buttered bread burns quickly.
Remove toasted buns and set aside on plates for assembly.
Step 8: Make Optional Sauce
If using the remoulade-style sauce, whisk together mayonnaise, ketchup, hot sauce, Worcestershire sauce, garlic powder, and lemon juice in a small bowl. Taste and adjust seasoning. This tangy, slightly spicy sauce adds another flavor layer but isn’t mandatory—the coleslaw provides plenty of creaminess and tang.
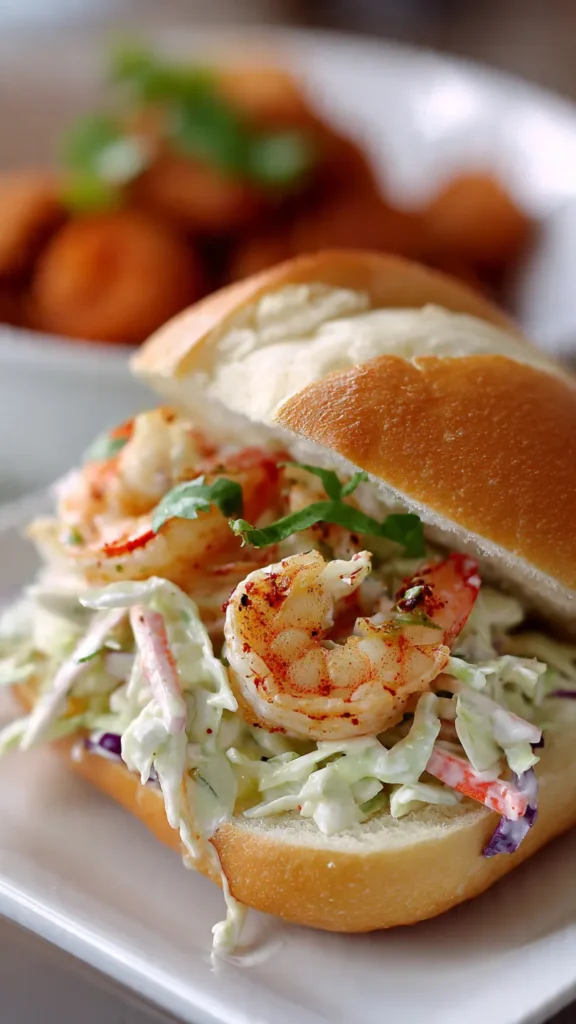
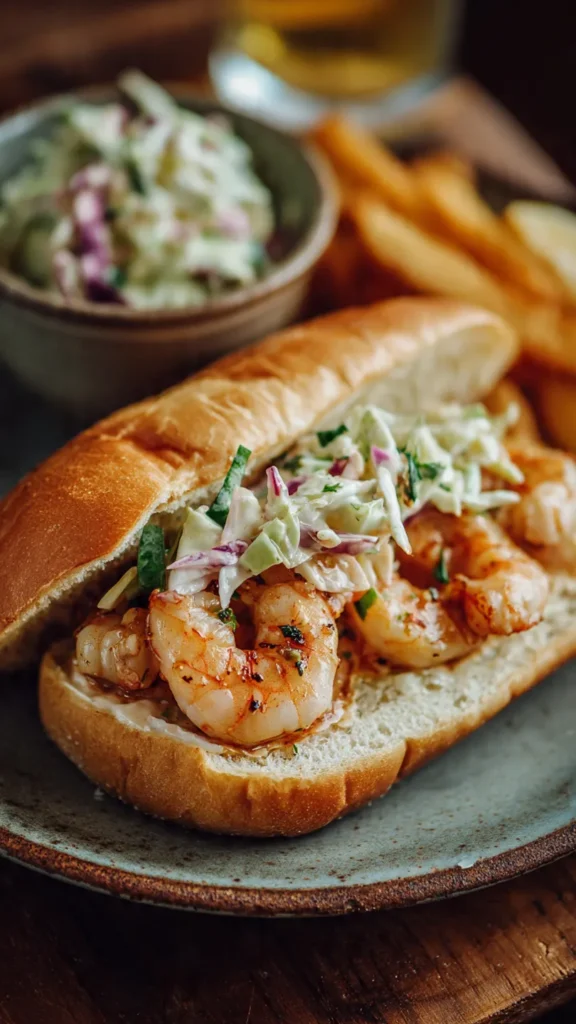
Step 9: Assemble the Sandwiches
Build each sandwich in this order for optimal structure and flavor:
- Bottom toasted bun
- Generous spread of optional sauce (or plain mayonnaise)
- Large lettuce leaf (acts as moisture barrier)
- 4-5 fried shrimp, arranged in a single layer
- Generous scoop of spicy coleslaw (about ½ cup), mounded high
- Tomato slices if desired
- Additional hot sauce drizzle for heat lovers
- Top toasted bun
Press down gently to compress slightly—the sandwich should be tall but manageable to eat.
Step 10: Serve Immediately
Serve shrimp sandwiches immediately while shrimp are still hot and crispy, with lemon wedges and extra hot sauce on the side. Provide plenty of napkins—these sandwiches are wonderfully messy and require hands-on eating.
The contrast between hot, crunchy shrimp and cold, tangy slaw is best enjoyed immediately after assembly.
Expert Tips & Tricks
Temperature Matters: Oil must be between 350-375°F for perfect frying. Too cool creates greasy shrimp; too hot burns coating before shrimp cook through. Use a thermometer, not guesswork.
Don’t Rush the Coating Rest: After breading, let shrimp rest 5-10 minutes before frying. This allows the coating to set and adhere better, preventing it from falling off during cooking.
The Secret to Non-Soggy Sandwiches: The lettuce leaf creates a barrier between wet coleslaw and the bottom bun, preventing sogginess. This restaurant trick keeps sandwiches structurally sound longer.
Common Mistake: Overcrowding the frying pot drops oil temperature dramatically, resulting in greasy, unevenly cooked shrimp. Fry in small batches of 4-5 shrimp maximum.
Test Kitchen Discovery: Draining fried shrimp on a wire rack instead of paper towels keeps the coating crispy by allowing air circulation on all sides and preventing trapped steam.
Customization Ideas
Protein Variations:
- Fish: Use cod, haddock, or catfish fillets cut into strips
- Chicken: Substitute chicken tenders for a landlocked version
- Oysters: Classic Southern fried oyster sandwich with same slaw
- Soft Shell Crab: For an elevated coastal treat
Coleslaw Variations:
- Asian-Inspired: Add sesame oil, rice vinegar, ginger, and cilantro to dressing
- Mexican Street Corn Style: Add cotija cheese, lime, chili powder, and cilantro
- Classic Creamy: Omit jalapeño and hot sauce for mild version
- Vinegar-Based: Replace mayo with more vinegar for tangy, lighter slaw
Bread Alternatives:
- Brioche buns (soft and buttery, classic choice)
- Soft hoagie or submarine rolls (traditional for po’ boys)
- Potato rolls (extra soft and sweet)
- Ciabatta rolls (more structure, less soft)
- Lettuce wraps (low-carb option)
- Toasted white bread (old-school diner style)
Heat Level Adjustments:
- Mild: Omit cayenne and jalapeño, use mild hot sauce sparingly
- Medium: Recipe as written with one jalapeño
- Spicy: Add extra cayenne to breading, increase hot sauce in slaw, add sliced jalapeños to sandwich
- Extra Hot: Use habanero instead of jalapeño, add Nashville hot sauce coating

Storage & Meal Prep
Make Ahead:
- Coleslaw: Make up to 24 hours ahead—it improves with time. Store refrigerated in airtight container
- Breading station: Set up components 2 hours ahead, keep refrigerated
- Breaded shrimp: Bread shrimp up to 2 hours ahead, refrigerate on rack, fry just before serving
- Sauce: Make up to 3 days ahead and refrigerate
Storing:
- Leftover fried shrimp: Refrigerate in airtight container up to 2 days. Reheat in 375°F oven for 8-10 minutes to re-crisp
- Coleslaw: Refrigerate up to 3 days in airtight container
- Assembled sandwiches: Not recommended—assemble fresh for best texture
Reheating:
Never microwave fried shrimp—it destroys the crispy coating. Reheat in a 375°F oven on a wire rack for 8-10 minutes until heated through and coating re-crisps. Assemble sandwiches with freshly reheated shrimp.
What to Serve With Shrimp Sandwiches
Perfect Pairings:
- French fries — Classic pairing, especially seasoned with Old Bay
- Sweet potato fries — Adds sweetness that complements spicy slaw
- Potato chips or kettle chips — For crunch contrast
- Corn on the cob — Buttered or grilled for summer cookout vibes
- Pickles — Dill pickles add extra tang
Complete the Meal:
Serve with hushpuppies, onion rings, corn salad, watermelon slices, or a simple cucumber salad with vinegar. For drinks, pair with cold beer, sweet tea, lemonade, or a crisp white wine.
Nutrition Facts (Per Serving)
Based on 1 sandwich:
Calories: 680-750 | Protein: 38g | Carbs: 62g | Fat: 32g | Fiber: 4g | Sugar: 8g | Sodium: 1450mg
Note: Nutrition varies based on bread choice, amount of oil absorbed during frying, and coleslaw portion size. These are estimates for a generously filled sandwich.
Your Questions Answered
Can I bake the shrimp instead of frying?
Yes! Arrange breaded shrimp on a greased baking sheet, spray with cooking oil, and bake at 425°F for 10-12 minutes, flipping halfway, until golden and cooked through. The texture won’t be quite as crispy as fried but it’s a healthier alternative.
How do I know when shrimp are done?
Shrimp are cooked when they turn opaque pink and the coating is golden brown. Internal temperature should reach 120°F. Overcooking makes them rubbery—2-3 minutes in 350-375°F oil is perfect.
Can I make this gluten-free?
Absolutely! Use gluten-free flour and gluten-free breadcrumbs (or crushed gluten-free cornflakes) for the coating, and serve on gluten-free buns.
What if I don’t have buttermilk?
Make your own by adding 1 tablespoon white vinegar or lemon juice to 1 cup regular milk. Let sit 5 minutes before using. Regular milk also works but won’t tenderize as effectively.
How do I keep fried shrimp crispy?
Drain on a wire rack (not paper towels), don’t stack shrimp on top of each other, and serve immediately. If holding, keep in a low oven (200°F) on a rack for up to 15 minutes.
Can I prepare the coleslaw ahead?
Yes! Coleslaw actually improves after sitting 30 minutes to 24 hours as flavors meld. Keep refrigerated in an airtight container.
Recipe History & Cultural Context
Shrimp sandwiches have deep roots in coastal American cuisine, particularly in the Gulf Coast and Southeastern states where shrimp are abundant. The most famous version is the New Orleans po’ boy, which emerged in the 1920s when streetcar workers (“poor boys”) needed affordable, filling sandwiches. Local restaurants began serving fried shrimp on French bread, and a legend was born.
The addition of coleslaw to fried seafood sandwiches likely originated from Southern fish fry traditions, where creamy slaw provided cooling contrast to hot, spicy fried fish and shrimp. The combination of hot and cold, crispy and creamy, creates textural and temperature contrasts that make these sandwiches memorable.
Spicy coleslaw specifically gained popularity as hot sauce culture expanded in American cuisine during the late 20th century. Buffalo wing sauce, Sriracha, and other hot condiments influenced home cooks to add heat to traditional recipes, resulting in creative variations like spicy slaw that adds dimension without overwhelming delicate seafood.
Today, shrimp sandwiches appear on menus from coast to coast, with regional variations reflecting local tastes. Louisiana versions emphasize Cajun spices and remoulade sauce; New England versions might use buttered rolls and lighter seasoning; Southern variations lean into buttermilk, hot sauce, and generous portions. Regardless of regional differences, the core appeal remains constant: perfectly fried shrimp with cooling, crunchy accompaniments that create a sandwich worth celebrating.
Printable Recipe Card
Shrimp Sandwich with Spicy Creamy Coleslaw
Crispy fried shrimp with tangy spicy slaw on buttery toasted buns
Shrimp: 1½ lb large shrimp – 1 cup buttermilk – 1 cup flour – 1½ cups panko – ½ cup breadcrumbs – 2 tsp Old Bay – 1 tsp garlic powder – 1 tsp smoked paprika – Salt & pepper – 2 eggs – Oil for frying
Slaw: 3 cups cabbage – 1 carrot – 2 green onions – 1 jalapeño – ½ cup mayo – 2 tbsp sour cream – 1 tbsp vinegar – 1 tbsp lime juice – 1 tsp honey – 1 tsp hot sauce – ½ tsp celery salt – Salt & pepper
Assembly: 4 buns – 3 tbsp butter – Lettuce – Lemon wedges
Instructions:
- Make slaw: combine veggies, whisk dressing, toss, refrigerate 15+ min
- Soak shrimp in buttermilk 10-15 min
- Set up breading: flour (bowl 1), beaten eggs (bowl 2), panko mix (bowl 3)
- Bread each shrimp: flour, egg, breadcrumbs. Rest 5-10 min
- Heat oil to 350-375°F in deep pot
- Fry shrimp in batches 2-3 min until golden, drain on wire rack
- Toast buttered buns until golden
- Assemble: bottom bun, sauce/mayo, lettuce, 4-5 shrimp, coleslaw, top bun
- Serve immediately with lemon wedges
Notes: Don’t overcrowd pot when frying. Drain on wire rack, not paper towels. Coleslaw improves after 30 min. Serve hot for crispy texture.