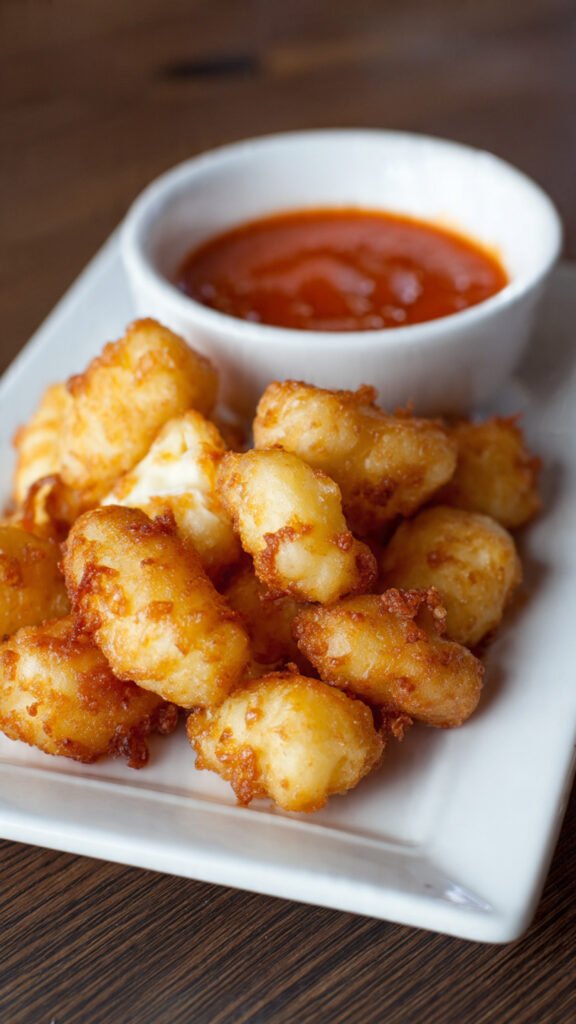
Homemade Cheese Curds: A Crispy Midwestern Classic

If you’ve never experienced the joy of biting into a perfectly fried cheese curd, you’re in for a treat. These golden, crispy nuggets of cheesy goodness are a beloved Midwestern delicacy that’s surprisingly easy to recreate at home. With a simple batter, the right technique, and a little patience, you’ll have restaurant-quality cheese curds that are crispy on the outside and deliciously gooey on the inside.
What Makes Cheese Curds Special
Cheese curds are young cheddar cheese that hasn’t been aged or pressed into blocks. They have a unique squeaky texture when fresh and are most commonly found in Wisconsin and other dairy-rich states. When you coat these little cheese treasures in a seasoned batter and deep fry them, magic happens. The exterior becomes wonderfully crispy while the cheese inside melts just enough to create an irresistible contrast of textures.
The beauty of making cheese curds at home is that you control everything—from the thickness of the batter to the level of seasoning. Plus, there’s something incredibly satisfying about pulling a batch of these crispy golden bites from the oil and enjoying them while they’re still hot.
Gathering Your Ingredients
For this recipe, you’ll need just a handful of simple ingredients that you likely already have in your kitchen. The star of the show is one pound of cheese curds, which typically comes in two 8-ounce packages. White cheese curds work beautifully, and brands like Cabot are excellent choices. If you can find fresh, squeaky cheese curds at your local grocery store or farmers market, even better.
For the batter, you’ll need one cup of all-purpose flour that’s been spooned and leveled for accurate measurement. The leavening comes from one and a half teaspoons of baking powder, which helps create that light, crispy coating. Season your batter with one teaspoon of onion powder, a quarter teaspoon of garlic powder, and one teaspoon of kosher salt. These aromatics add depth without overpowering the cheese.
The wet ingredients include one cup of cold buttermilk and one large egg at room temperature that’s been well beaten. The buttermilk adds tanginess and helps create a tender coating, while the egg provides structure and richness. For frying, you’ll need three to four cups of vegetable oil, depending on the depth of your skillet.
Preparing the Cheese Curds
The first crucial step is preparing your cheese curds properly. Use paper towels to pat them completely dry, removing any excess moisture. This step is essential because water and hot oil don’t mix well, and dry curds will fry more evenly. Once they’re dried, place them in the freezer for 10 minutes. This might seem like an odd step, but it’s actually the secret to preventing your cheese from completely melting out of the batter during frying. The cold cheese stays firm longer, giving the batter time to set and crisp up.
Heating the Oil
While your cheese curds chill, it’s time to heat the oil. Use a 10-inch deep-sided skillet and add your vegetable oil—the amount will depend on your skillet’s depth, but you need enough to completely submerge the cheese curds. Attach a candy or deep-frying thermometer to the side of the skillet. This thermometer is your best friend in this recipe because maintaining the correct oil temperature is absolutely critical for success.
Heat the oil over medium-high heat until it reaches exactly 375°F. This temperature is the sweet spot for frying cheese curds. If the oil is too hot, your batter will burn before the cheese has a chance to warm through. If it’s too cold, your cheese curds will absorb too much oil and become greasy instead of crispy.
Creating the Perfect Batter
While the oil heats, prepare your batter. In a medium bowl, combine the flour, baking powder, onion powder, garlic powder, and salt. Whisk these dry ingredients together thoroughly to ensure even distribution of the seasonings and leavening agent. This step prevents pockets of baking powder or seasoning in your finished batter.
Next, add the cold buttermilk and beaten egg to the dry ingredients. Whisk vigorously until the batter is completely smooth with no lumps remaining. The consistency should be thick enough to coat the cheese curds evenly without being so thick that it creates a heavy, doughy coating. If your batter seems too thick, you can add a tablespoon of buttermilk at a time until you reach the right consistency.
The Frying Process
Before you start frying, prepare a landing spot for your cooked cheese curds. Line a baking sheet with several layers of paper towels—this will absorb excess oil and help keep your cheese curds crispy. Remove the cheese curds from the freezer. Working in small batches is crucial here. Take each cheese curd and dip it into the batter, making sure it’s completely coated. Let any excess batter drip off, then carefully lower it into the hot oil.
Add no more than eight or nine cheese curds at a time to the oil. Overcrowding the pan will cause the oil temperature to drop significantly, resulting in greasy, soggy cheese curds instead of crispy ones. As the curds fry, monitor your thermometer and adjust the heat up or down to maintain that steady 375°F temperature.
Fry the cheese curds for one and a half to two minutes per side, or until they’re a beautiful golden brown. Use a slotted spoon to carefully turn them halfway through cooking, and then to remove them from the oil when they’re done. Transfer the fried cheese curds to your prepared baking sheet. Repeat this process with the remaining cheese curds, always being mindful of maintaining the proper oil temperature between batches.
Serving Your Cheese Curds
The best time to enjoy cheese curds is immediately after frying while they’re still hot and the cheese is perfectly melted. Serve them with your favorite dipping sauces—ranch dressing, marinara sauce, or even a spicy aioli all pair wonderfully. These make an excellent appetizer for game day, parties, or any time you want to impress guests with your cooking skills.
Storage and Reheating
If you somehow have leftovers, store fresh cheese curds in an airtight container in the refrigerator for two to three days. For the best texture preservation, wrap them in wax paper before placing them in the container. For longer storage, freeze the cheese curds flat on a baking sheet, then transfer them to a freezer-safe bag where they’ll last up to three months.
When it’s time to reheat, skip the microwave entirely as it will make your cheese curds rubbery. Instead, use an air fryer set to 375°F for three to four minutes, checking halfway through. This method will restore that crispy texture beautifully. Alternatively, reheat them in a 375°F oven for five to seven minutes.

Expert Tips for Success
Temperature control is everything when frying cheese curds. Always use a thermometer rather than guessing—it’s the difference between perfect and disappointing results. The freezing step isn’t optional; it’s what keeps your cheese from completely melting out of the batter before the coating crisps up. Make sure your batter is well-balanced—thick enough to coat evenly but not so thick that it creates a heavy shell around the cheese.
Work in small batches even if it takes longer. Patience here pays off with consistently crispy results. Finally, serve these cheese curds hot for the best experience. The contrast between the crispy exterior and the warm, gooey cheese inside is what makes them so irresistible.